Fixing a Leaky Faucet
Fixing a Leaky Faucet
A leaky faucet can waste up to 20 gallons of water a day. If the water is hot, you are heating the water before you waste it, which can be very expensive. In almost every case, a faulty seat washer (also called a stem washer or “O” rings) is the cause of a faucet that still drips even though the handle has been tightly closed. This is true for the kitchen, bath, tub and shower faucets. With just a little bit of effort, you can replace this washer yourself. (If you are not confident call a plumber).

First, determine whether your faucet is washerless or is a compression type faucet and what the brand name and model # is if possible.
Before you start make sure you protect any shiny pars of your faucet by wrapping them with a couple of layer of masking tape. This will keep them from getting scratched by your wrench.
Place a towel in the sink to cover the drain. This will prevent any small parts from falling down the drain.
Tools and supplies you may need:
- Screwdriver slotted or Phillips.
- Adjustable wrench or pliers.
- Replacement washers and tap fixer tool need to be purchased at a hardware store. Ask lots of questions while you are there.
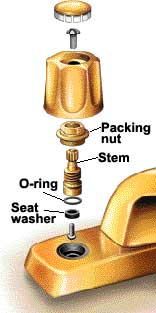
Determine where the leak is coming from. If is it coming from around the handle follow steps 1 and 2. Then cover the threads beneath the packing nut with Teflon tape and tighten it gently. Never over tighten this nut. If the leak persists, remove the nut entirely; replace the nylon washer underneath and reassemble the faucet.
- If it is coming from the stem of the follow steps 1, 2 and 3. Then unscrew the stem from the six-sided packing nut to expose the plastic O-ring. Pinch the O-ring on the stem to get a finger hold, and then pull it off. Replace with an exact match that has been lubricated with a little petroleum jelly and reassemble the faucet.
- If it is coming from the faucet itself then you will need to follow all of the steps below to repair the leak.
Fixing the Leak
Step 1. Check to see if the faucet is leaking hot or cold water. You may have to fix one handle unit, not both. Shut off the water supply valves under the sink. If you cannot locate them or if they will not shut off, shut off the master supply to the house. Turn on both faucets to let the water drain.
Step 2. If there is a decorative plastic button on top of the handles, slip the blade of your screwdriver under the edge and twist the screwdriver gently. The button should pop right off. Unscrew the top of the screwdriver and pull or pry of the handle. It may stick because of rust. Take it off as gently as possible. Never bang the handle free- the inner workings might break.
Step 3. Beneath the faucet handle is top stem. Fit your wrench to the large six-sided packing nut and loosen it. It may unscrew in either direction, so try turning it the opposite way if it does not loosen on your first try. Unscrew the nut with your finders until you can lift the whole stem out of the faucet.
Step 4. On the bottom of the stem, the bottom screw holds a rubber washer in place. Unscrew it, put a new washer of the same size in place, and them replace the screw.
Step 5. Rub a little petroleum jelly on the threads of he bottom stem. Screw the stem back into place, tightening it with your wrench. Put the handle back on and turn the water supple on.
![]()
Conservation Rebates
![]()
Conservation Tools
![]()
Indoor Conservation
![]()
Outdoor Conservation
![]()
